
 España
  Francais
  Polish
  Čeština
  Greek
Greek  Romanian
  Arabic
  Português
  Indonesian
  Croatian
  Serbia
  Farsi
Farsi  Hebrew
  Mongolian
  Bulgarian
  Georgia
  Azerbaijani
  Turkish
  Magyar
 Return payments - How to generate a batch payment order for the bank
batch payment, overpayments, payment plan, bank account details, credit, debit payments


I. Necessary prerequisites and settings before generating a batch payments file
In order to generate a batch payments order to the bank, it is necessary that users have an account number specified in the system.
--> Preferably the account number for refund payments is entered by the parents themselves.
The school can also ask the parents to do so via email - there is a template 'Refund of overpayments' in the payment module with a link to instructions How a user sets up a bank account information for return money payments.
For more information about sending emails please see - Reports to print, e-mail templates, export to excel.
Reasons why it should be parents who set up the account:
- if the account numbers were entered by a school staff, it would cost them a lot of work and typing mistakes could be made
- the parent can wish to enter a different account for the refund payments than the account they made the initial payment from
- if, in the course of the year, the parents made fees payments from different accounts and the school imported payments from the bank statement, the system will remember the last account, from which a payment was realized and assigned to a payment => it is therefore the responsibility of the parent to check the account set up for potential refund money
--> If the school decided to enter the account numbers manually anyway - see Return payments - How to enter the account for refund
--> it is important for the school to check its own account settings for accounts which it will not return overpayments to - item 10. in Setting of school bank accounts and rights in payment module. This is especially necessary if the school receives aggregate payments for several students - e.g. for interest groups from various organizations or sports clubs. In the module settings, the school inputs the accounts so the system can set bad accounts to the students. Any overpayments will not be returned to a wrong account
- in case of payers settling payments by cheque, the system may have stored the account number of the post office, not the account number of the payer
II. Generating batch payments
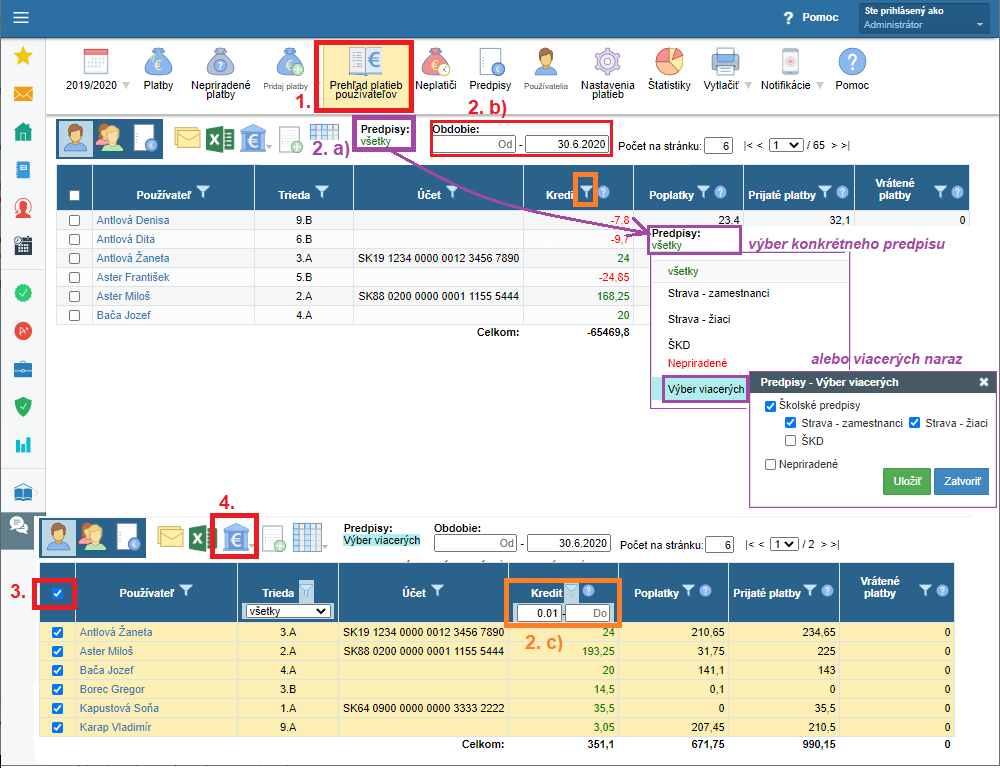
1. you can generate a file for a batch payment order under 'Users' payments overview' (1.)
2. Filters - how to search for overpayments properly
When generating batch payments order for the bank it is at first necessary to clarify what overpayments you want to send and use the filter accordingly.
Multiple filters can be used in the table. The most important setting for the correct assessment of the amount in each column is the specified date 'to' for the period located above the table.
For the correct display of overpayments, the following filters are required:
a) filter for a specific payment plan or several payment plans together (2 a.)
=> especially important if several school staff members work with the payment module and each of them manages different payment plans or if the school has multiple accounts and overpayments wil be returned from multiple accounts too
=> pay attention to payments received but not assigned to any payment plan
b) in particular it is very important to set the time period properly (2 b.)
=> not every credit is necessarily an overpayment
=> at a certain moment a fee paid before its due date may also seem as credit if you have specified an earlier date for the 'till' period than the due date of the fee
< b>=> for end-of-year accounts clearing, the selected period above the table may not be shorter than the maturity of the last fee of the selected payment plans
=> a common error in charging for canteen meals: at the end of the school year the school incorrectly enters the 'till' date for a period in which the due date of the 'refund of the deposit' fee is not included
c) overpayments of the users - filter in the column 'Credit' from 0,01; or another amount, if you want to return only overpayments beginning from a specific amount and higher (e.g. from 10€) (2 c.)
d) to send the overpayments in parts, the filter can be set for specific groups - e.g. students/teachers only or for senior/ninth-graders only (the class column)
- we advise you to name the individual generated files according to the filter - the generated files will thus be in order and the name of each file will be unique (the system names the file only with the current date)
3. select the users you want to return the money to - either all at once (square in the header) or individually (square in rows)
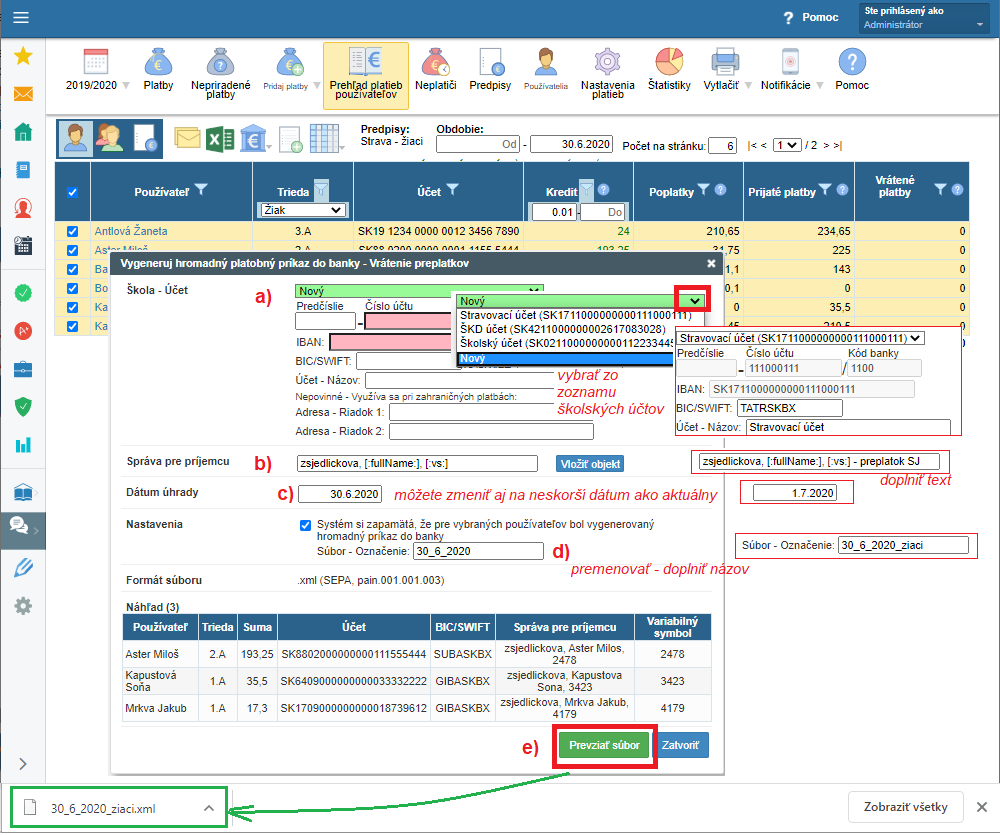
4. click the icon for generating a batch payments order
a) the account number from which you are going to return money - preferably select from the list of school accounts, but IBAN can also be entered
=> important: if your school has several accounts, remember not to filter out overpayments for payment plans paid to a different account
b) message for recipient - a text preset by the system is EduPage school name, full user name and variable symbol - it is the texts in square brackets
=> you can amend or change the message for the recipient completely
c) payment date - a date of sending payments from the account
=> EduPage sets today's date automatically
=> some banks only authorize a next day's and later due date - therefore it has to be changed
=> some banks accept only one import file for batch payments order with the same maturity date
=> for example if you generate several files in one day, but you plan on uploading them to internet banking at a later time (= in another day), the due date should be changed too, as banks do not accept elapsed time date in imports
d) select proper file name - the system automatically names the file by the current date
=> the file name is entered in the column in the user payment report to individual users listed in the file
=> if you are generating a file for batch payments repeatedly during the same day (whether as multiple attempts or for different groups of users), the label has to be edited ! - add adequate text. This is important in order not to lose track of the files generated on EduPage, and also to be able to import the right file to the bank.
e) downloading file click the button to generate the file in the .xml format (format readable for the banking system)
=> based on the settings for downloading files in your browser, the batch payments file appears in the bottom bar on the bottom left side or a dialog box prompts you to save the file to disk (you choose the storage location for yourself)
=> the generated file can be reopened / downloaded at any given time, just click on the file name in a row of any user
a) in the 'Users' payments overview' there is acolumn titled 'Generated payments files for bank' - there you can view files generated for individual payers
b) if you can't see the column in the table, it can be displayed via the grid icon in the list of columns, the green tick indicates the column displayed
c) the list of generated files can be filtered and thus display only the list of users in that file
d) clicking on the file name will reopen the dialog box in which it is possible:
1. to change a file name - for example if you have several files with the same name
2. to delete a file - for example if you did not use it or did not enter something correctly
3. to re-download a file - for example if you have not saved it anywhere
Other data in the file cannot be changed. Therefore, if you made a mistake (e.g. set a wrong filter for overpayments, did not enter all incoming payments, maturity date in the file has already passed,...) delete the unused file and generated a new one. You can check if the overpayments have actually been paid in the bank statement of the school's account.

III. Importing a file to the bank
The generated file needs to be uploaded to your internet banking.
Overpayments are sent to users' accounts according to the list in the file. If there was a typo in the user's account number and no such account exists, the money will be sent, but also returned to the school account.
If you notice an error when importing a file in internet banking, it is possible that:
-> the file you have generated on EduPage is obsolete if it has been generated the previous day and has a maturity date that expired -> file must be generated anew with a valid due date and the old unused file has to be deleted in EduPage
-> check the file for typos in the users' account number - IBAN begins with two letters indicating the country, and they must be both uppercase letters (EN, CZ ...)
Note:
The internet banking environment of each bank is different. Generally you are looking for 'Batch payment' in Payments and file 'Import', see example:

IV. Finalization
For the full completion of the settlement of the pupil's payments on EduPage, it is important to record these payments paid from the school account. This can be done in a way similar to the received payments - manually or by importing an account statement. Payments paid are recorded with a minus sign.
When importing an account statement , the import setting has to be changed to 'all payments' or 'debit payments' (by default, the setting is for ' credit payments' only).
See Return payments - How to record return of overpayment/payment for more details.
Attention:
- the Users' payments overview displays the state for the selected time period (above the table) that can be overwritten - by default it is 'from:' empty - 'to:' current day's date
- when selecting a time period, the maturity of the payment plans should also be taken into account
- not every credit is necessarily an overpayment - at a specific time the credit can be a payment plan paid a couple of days in advance, if its maturity is in the selected time period
- if a school has a lot of payment plans, it is easier to filter and generate files for the batch payments by payment plan. Working with dates and recipient information is thus is easier. (Subsequently, the import of a bank account statement for the debit payments is made easier too.)
- some banks accept only one file / import with identical maturity date. If you need to generate batch payments partially for certain groups of payers, you need to enter a different payment date.
Please see our further tutorials - Incoming payments handling